.jpg)
Preparing Your Artwork For Dtg Printing – Using Eco Merch Templates
Our website and App designer will auto-scale your artwork and give you the opportunity to tweak the size and position by eye against a medium garment mock-up. However, if you have specific sizing and positioning, or would like to follow our positioning advice then we have a series of templates with instructions for you to download and follow.
The basics are as follows:
The max artwork size is 45x35cm for T-shirts and Sweats (Men's and Unisex - front and back) and the back print on Hoodies (Men's and Unisex). The front print of Hoodies (Men's and Unisex) has a max print area of 25x45cm and children's T-shirts, Sweats and also Tote bags have a max print size of 25x25cm .
Use this template to scale and position your artwork before uploading to the Eco Merch APP or website. It should be scaled to the size you would like it printed and 300dpi.
The top of the artboard will be printed 3cm from the bottom stitching of the neck line of the garments or the whole artboard will be placed centrally on a tote bag. For best results please follow our positioning suggestions.
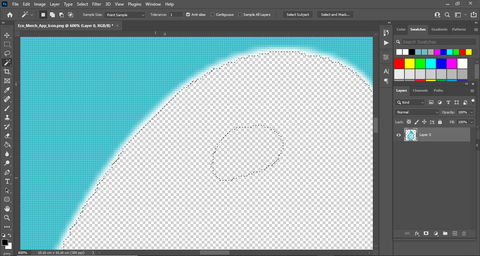
Edges should be perfectly crisp.
Avoid semi transparent pixels and gradients. Any blurred edges or semi transparent pixels will have a white layer printed underneath which may appear like a white border around the edge of the print. Any faded edges or blends to the t-shirt colour will not work for the same reason. Designs with faded edges or blends will need a custom white base creating. Get in touch with us before placing an order if this is the case and we can discuss costs and lead time for the artwork process. See our blog post on PREPARING YOUR ARTWORK FOR DTG PRINTING - Blends and Transparencies
A good way to check if you have semi transparent pixels is to use the magic wand tool (make sure ‘contiguous’ is not checked) and click anywhere outside the artwork. Now zoom in around your artwork. If the edges are blurred or pixels are not empty where they should be you will get an idea of where our DTG machines will print a white base.
You can add a new layer underneath your artwork and fill the selection with white to get a further idea of the print result.

To see what that would look like on a coloured garment, add a background layer to your artwork file and fill it in with your garment colour.

From this point you can select and delete or erase any unwanted areas. to remove the blurred edges you could select the negative (transparent space) and click Select/Modify/Expand and increase the number of pixels to expand by according to how blurred your edges are. Now just delete that pixel information.
Rasterize all text by right clicking on the text layer and choosing ‘rasterize type’.
Make all black areas of the design pure black (hex #000000)
See the example artwork on each template for a good example of how edges should be, general image quality and resolution.
Once you have completed the artwork, hide all of the template layers so you can only see your artwork, save a copy as a psd or editable pdf in case you need to make changes and then save your artwork as a png file.
Upload, complete your order and we'll do the rest.